> ## Documentation Index
> Fetch the complete documentation index at: https://docs.maia.ai/llms.txt
> Use this file to discover all available pages before exploring further.

# Maia runner installation using a CloudFormation quick-create link

export const m_runner = "Maia runner";

export const maia = "Maia";

export const RunnerMetadata = ({runnerType, platforms = []}) => {
  return <div style={{
    background: 'var(--colors-background-light, #f9fafb)',
    border: '1px solid var(--colors-border-default, #e5e7eb)',
    borderRadius: '12px',
    padding: '20px 28px',
    marginBottom: '28px'
  }}>
      <table style={{
    width: '100%',
    borderCollapse: 'collapse'
  }}>
        <tbody>
          <tr>
            <td style={{
    fontWeight: '600',
    paddingRight: '32px',
    paddingBottom: '14px',
    whiteSpace: 'nowrap',
    verticalAlign: 'middle',
    width: '180px'
  }}>Runner type</td>
            <td style={{
    paddingBottom: '14px',
    verticalAlign: 'middle'
  }}>{runnerType}</td>
          </tr>
          <tr>
            <td style={{
    fontWeight: '600',
    paddingRight: '32px',
    whiteSpace: 'nowrap',
    verticalAlign: 'middle'
  }}>Runner platform</td>
            <td style={{
    verticalAlign: 'middle'
  }}>
              <div style={{
    display: 'flex',
    flexWrap: 'wrap',
    gap: '8px'
  }}>
                {platforms.map((platform, i) => <span key={i} style={{
    background: '#dcfce7',
    color: '#15803d',
    border: '1px solid #bbf7d0',
    borderRadius: '9999px',
    padding: '3px 12px',
    fontSize: '0.85rem',
    fontWeight: '500',
    whiteSpace: 'nowrap'
  }}>
                    {platform} ✅
                  </span>)}
              </div>
            </td>
          </tr>
        </tbody>
      </table>
    </div>;
};

<RunnerMetadata runnerType={`${maia} Hybrid`} platforms={["AWS"]} />

This article details how to install a Matillion {m_runner} on Amazon ECS Fargate using a CloudFormation template quick-create link. The quick-create CloudFormation link will pre-fill values into the template for you.

Alternatively, you can download the CloudFormation template and edit as needed.

***

## Prerequisites

To get started, you'll need:

* A [{maia}](https://app.matillion.com/hub/) account. To register, read [Registration](/docs/administration/registration).
* Access to AWS, with the permissions to create a stack on a billable account. You may need an administrator from your organization to either give access or perform this process with you.
* Permissions to provision cloud resources in the AWS environment that the source database is running in.
* An IAM role that has suitable permissions for {maia}. If you're using the same IAM role, you might need to add `cloudformation.amazonaws.com` to the **Service** section in the **Trust Relationship** section of your IAM role to allow the role to work with the ECS service. An example trusted entity can be found below. Read [Third-party environment roles and permissions](/docs/security/third-party-roles-and-permissions) for more information about creating IAM roles.

You'll also need to allow the IP addresses listed in [Network access and IP AllowList requirements](/docs/security/network-access-and-ip-allowlist-requirements#agents-and-git-repositories).

Example trusted entity:

```json theme={null}
{
    "Version": "2012-10-17",
    "Statement": [
        {
            "Sid": "",
            "Effect": "Allow",
            "Principal": {
                "Service": "cloudformation.amazonaws.com"
            },
            "Action": "sts:AssumeRole"
        }
    ]
}
```

To learn more about the trust relationship IAM policies, read [trust policies](https://aws.amazon.com/blogs/security/how-to-use-trust-policies-with-iam-roles/).

We recommend that you read the documentation and prerequisites before beginning this process. You may require input from your organization's cloud administrator for access and permissions.

For detailed AWS permission information about deploying a {m_runner} in {maia}, read [{m_runner} deployment permissions](/docs/security/third-party-roles-and-permissions#maia-runner-deployment-permissions).

***

## Created resources

This template will create the following resources in your AWS account:

* ECS task definition.
* ECS Fargate cluster.
* CloudWatch log group.
* An entry in AWS Secrets Manager.
* IAM roles with permissions for the following:
  * Task roles to your ECS, EC2, and Secrets Manager.
  * Task execution roles to pull from ECR Public repositories.

***

## Visualization

<img src="https://mintcdn.com/matillion/I06T4ygCZYYqgb0_/images/agent-installation-cloudformation-quick-create/agent-installation-cloudformation-quick-create-01.png?fit=max&auto=format&n=I06T4ygCZYYqgb0_&q=85&s=906aa0b63972a8b66f22e003ca8cf80e" alt="CloudFormation visualization" width="784" height="884" data-path="images/agent-installation-cloudformation-quick-create/agent-installation-cloudformation-quick-create-01.png" />

***

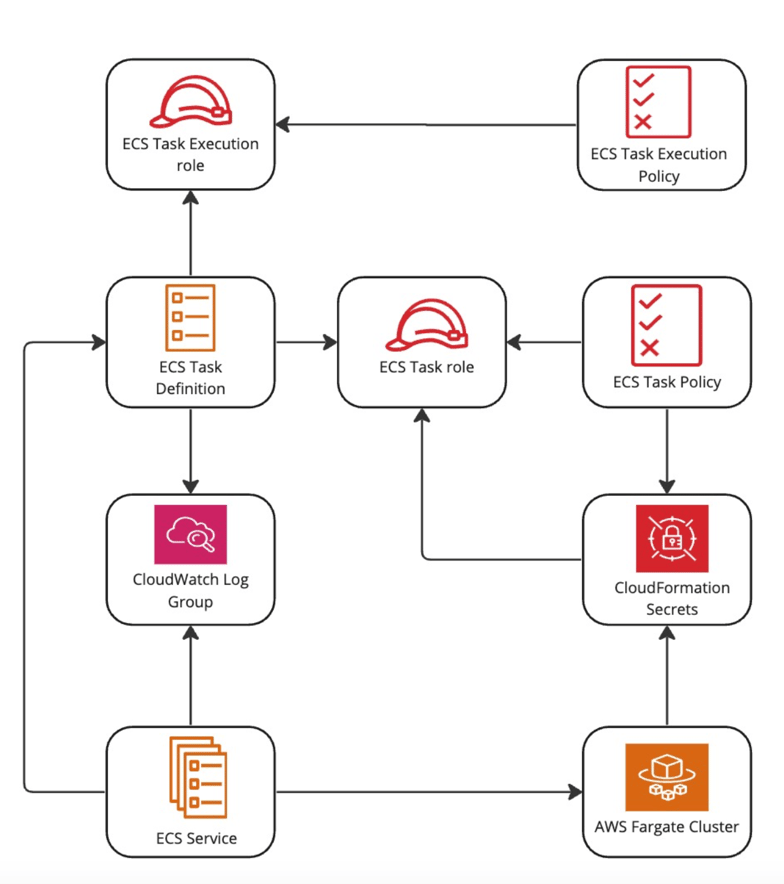
## Using the CloudFormation link

1. [Create a {m_runner}](/docs/guides/create-a-runner) in {maia}.

2. On the **Runner details** page, note the **Credentials**: `client_id` and `client secret`.

3. On the **Deployment** tab of the **Runner details** page, click the **Launch** button. This will launch the CloudFormation stack in the AWS Console with pre-filled values for most parameters.

4. Complete the remaining parameters as follows:

   * **Stack name:** An arbitrary name given to the created stack. Must be unique. This will be pre-filled, but if you are reinstalling a {m_runner} you will need to change the stack name. Consider increasing the number that is added to the end of the stack name.
   * **OAuth Client ID:** Copy the retrieved `client_id` from the **Runner details** page.
   * **OAuth Client Secret:** Copy the retrieved `client_secret` from the **Runner details** page.
   * **VPC ID:** Select the ID of an existing VPC. For more information, read [VPCs](https://console.aws.amazon.com/vpc/home?#vpcs).
   * **VPC Subnet IDs:** Select at least one VPC subnet to use.

5. Click **Create stack**.

Once your stack is ready, this means the ECS service has now successfully deployed. The {m_runner} will then start. You can return to the {m_runner} dashboard and view the {m_runner}s list. Your new {m_runner} will be on the list and will have a **Running** status.
