| Runner type | {runnerType} |
| Runner platform |
{platforms.map((platform, i) =>
{platform} ✅
)}
|
 ***
## Using the CloudFormation link
1. If you haven't already created the agent in {maia}, follow the procedure in [Create a {s_runner}](/docs/streaming/create-streaming-agent).
2. On the **Runner details** page, note the following **Credentials**: `client_id` and `client secret`.
3. Ensure you are logged in to your AWS account before proceeding.
4. Under **Install using CloudFormation** on the **Runner details** screen, click **Launch**. This will launch the CloudFormation stack in the AWS Console with pre-filled values for most parameters.
5. Complete the remaining parameters as follows:
* **Stack name:** An arbitrary name given to the created stack. This must be unique.
* **OAuth Client ID:** Copy the `client_id` from the **Runner details** page.
* **OAuth Client Secret:** Copy the `client_secret` from the **Runner details** page.
* **VPC Id:** Select the ID of an existing VPC. For more information, read [VPCs](https://console.aws.amazon.com/vpc/home?#vpcs).
* **VPC Subnet Ids:** Select at least one VPC Subnet to use.
* **Database VPC Security Groups:** Select at least one security group associated with your databases.
6. Ensure that the **CPU** and **RAM** allocation is appropriate for the workloads your Streaming pipelines will manage. Read [Sizing {s_runner}s](/docs/streaming/sizing-streaming-agents) for guidance.
7. If you intend to use MySQL as a streaming data source, you will need to complete additional configuration under the **Optional MySQL Support** section. Read [Configure the {s_runner} for MySQL](/docs/streaming/mysql-configure-agent) for details.
8. Click **Create stack**.
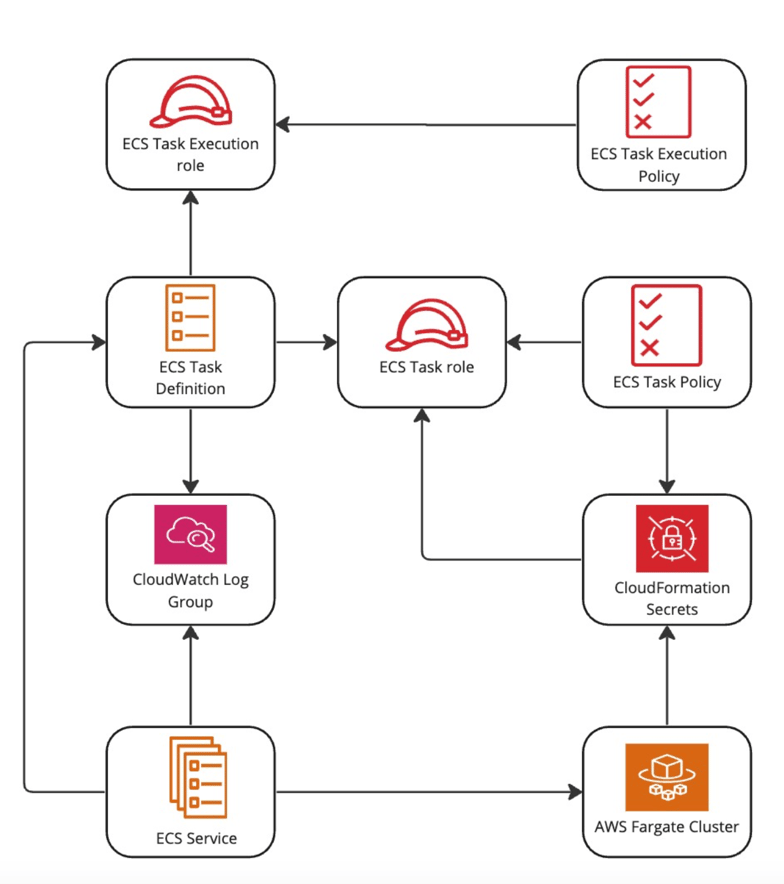
Once your stack is ready, this means the ECS service has now successfully deployed with 1 ECS task.
***
## Using the CloudFormation link
1. If you haven't already created the agent in {maia}, follow the procedure in [Create a {s_runner}](/docs/streaming/create-streaming-agent).
2. On the **Runner details** page, note the following **Credentials**: `client_id` and `client secret`.
3. Ensure you are logged in to your AWS account before proceeding.
4. Under **Install using CloudFormation** on the **Runner details** screen, click **Launch**. This will launch the CloudFormation stack in the AWS Console with pre-filled values for most parameters.
5. Complete the remaining parameters as follows:
* **Stack name:** An arbitrary name given to the created stack. This must be unique.
* **OAuth Client ID:** Copy the `client_id` from the **Runner details** page.
* **OAuth Client Secret:** Copy the `client_secret` from the **Runner details** page.
* **VPC Id:** Select the ID of an existing VPC. For more information, read [VPCs](https://console.aws.amazon.com/vpc/home?#vpcs).
* **VPC Subnet Ids:** Select at least one VPC Subnet to use.
* **Database VPC Security Groups:** Select at least one security group associated with your databases.
6. Ensure that the **CPU** and **RAM** allocation is appropriate for the workloads your Streaming pipelines will manage. Read [Sizing {s_runner}s](/docs/streaming/sizing-streaming-agents) for guidance.
7. If you intend to use MySQL as a streaming data source, you will need to complete additional configuration under the **Optional MySQL Support** section. Read [Configure the {s_runner} for MySQL](/docs/streaming/mysql-configure-agent) for details.
8. Click **Create stack**.
Once your stack is ready, this means the ECS service has now successfully deployed with 1 ECS task.