> ## Documentation Index
> Fetch the complete documentation index at: https://docs.maia.ai/llms.txt
> Use this file to discover all available pages before exploring further.
# Streaming pipelines
export const Projects = () => <>the Projects icon ;
export const s_runner = "Streaming runner";
export const designer = "Designer";
export const maia = "Maia";
export const maia_0 = undefined
This feature is available to customers on specific editions. Visit the {maia_0} [Pricing](https://www.maia.ai/pricing) page to learn more about each edition.
Streaming pipelines provide a complete end-to-end solution for near-real-time data ingestion, allowing you to capture data from a source database and write it to either cloud storage or a cloud data warehouse.
Streaming pipelines can be used together with {maia}'s batch [pipelines](/docs/guides/pipelines) to give an end-to-end Extract, Load, Transform (ELT) process. You can use a Streaming pipeline to **Extract** data from a source and **Load** it into a cloud data warehouse, and then use a transformation pipeline created in [{designer}](/docs/guides/designer-overview) to **Transform** the data for downstream purposes.
You access the Streaming feature via a {maia} [project](/docs/guides/projects).
***
## Video example
Expand this box to watch our video about using Streaming pipelines.
***
## Core concepts
The following key terms are used throughout the documentation and user interface.
### Sources
Streaming pipelines use Change Data Capture (CDC) and only currently support relational databases as sources. The following sources are supported:
* [Db2 for IBM i](/docs/streaming/db2-for-ibm-i-streaming-source/)
* [Microsoft SQL Server](/docs/streaming/microsoft-sql-server-streaming-source/)
* [MySQL](/docs/streaming/mysql-streaming-source/)
* [Oracle](/docs/streaming/oracle-streaming-source/)
* [PostgreSQL](/docs/streaming/postgresql-streaming-source/)
Streaming pipelines don't require a signal table to be set up in the source database.
### Destinations
The destination is a cloud data warehouse or cloud storage location where the {s_runner} will deliver change event data captured from the source database. The following destinations are supported:
* [Amazon S3](/docs/streaming/amazon-s3-streaming-destination/)
* [Azure Blob Storage](/docs/streaming/azure-blob-storage-streaming-destination/)
* [Snowflake](/docs/streaming/snowflake-streaming-destination/)
You can also use a {maia} [pre-built pipeline](/docs/streaming/sync-all-tables/) to process change event data delivered to cloud storage and load it into Snowflake, Databricks, or Amazon Redshift.
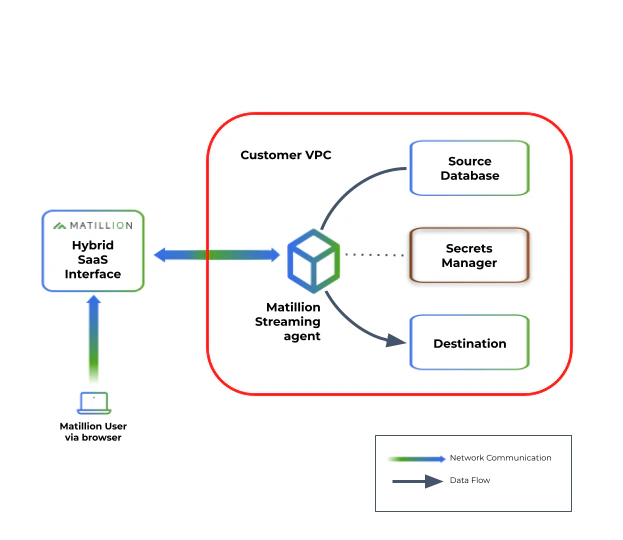
### Streaming agent
The {s_runner} is a service that is deployed and configured within your cloud infrastructure and is responsible for securely connecting via a secrets management application to both the source database and the destination data warehouse or cloud storage. Read [Create a {s_runner}](/docs/streaming/create-streaming-agent) for details.
### Pipelines
A pipeline is a collection of configuration details, including source and destination configurations, that enable the {s_runner} to monitor and consume database changes, delivering them to the appropriate data warehouse or cloud storage location. Since there is a 1-to-1 relationship between a {s_runner} and a pipeline, multiple {s_runner}s are required to configure and run multiple pipelines. Creation of streaming pipelines is described [below](#create-a-streaming-pipeline) for details.
***
## Key features of the Streaming pipeline architecture
Streaming pipelines use a Hybrid SaaS approach by using {s_runner}s hosted within your own cloud provider infrastructure to control data flow. The {s_runner} serves as a bridge between the source database and the destination data warehouse or cloud storage location, capturing and handling the data that flows through the Streaming pipeline. By keeping the {s_runner}s within your own infrastructure, you retain control over data security and data sovereignty. Each {s_runner} controls the operation of a single Streaming pipeline, meaning you can scale to stream from multiple data sources by deploying additional {s_runner}s.
This approach provides the following benefits:
* **Data stays within your private cloud:** The {s_runner} is deployed in your private cloud infrastructure, which means that the change data that's being streamed from the source and written to the destination by the Streaming pipeline remains within your infrastructure, and you retain control over data security and data sovereignty.
* **Continuous operation:** Once the {s_runner} is configured and started, it operates autonomously without requiring much intervention. The {s_runner} continuously monitors all changes occurring in the source database, and delivers those changes to the designated destination data warehouse or cloud storage. This ensures a continuous and reliable change data capture process.
* **Pipeline monitoring:** {maia} allows you to monitor the status of each Streaming pipeline, ensuring visibility of the data capture process.
* **Accurate representation of the source database:** Streaming pipelines read database change logs from the source database to provide a consistent and up-to-date picture of the tables you have selected in that database. This ensures that the captured data reflects the latest changes to those tables.
* **Minimal resource usage:** The log consumption approach used by Streaming pipelines keeps the resource usage on the source database to a minimum. The Streaming pipeline doesn't query the source table in full for each change, it "listens" for record changes, resulting in a low impact on the source database.
* **Database snapshots:** Snapshotting the source database of a Streaming pipeline allows you to establish an up-to-date view of the database, giving you a baseline from which streaming changes begin. A snapshot can be taken at any time after the pipeline has started, to allow the loading of historical data. You can specify the historical data that the snapshot will load, and you can control the timing of the snapshotting to minimize disruption to ongoing streaming.
To enable configuration and monitoring through {maia} interface, the {s_runner} establishes a secure connection back to the Matillion SaaS platform. This connection ensures secure communication between the {s_runner} and the platform for configuration updates, status monitoring, and {s_runner} management, though none of your streaming data is ever passed outside your infrastructure.
The {s_runner} requires access to a cloud secrets service, which is a secure storage system for storing authentication and connection credentials (known as "secrets"). These secrets are used by the {s_runner} to authenticate itself with the source database and establish a secure connection for capturing the data changes. For details of how {maia} uses secrets, read [Secrets overview](/docs/administration/secrets-overview).
This architecture is illustrated in the following diagram.
When you create a Streaming pipeline, the following happens:
1. **Connecting to the source database:** The {s_runner} establishes a connection with the source database, allowing it to capture data changes and track them in near real time.
2. **Snapshotting the source database:** An optional database snapshot captures a point-in-time view of your source database, to establish a current view of the data as a baseline from which to begin capturing changes to the data. Read [Overview of snapshotting](#overview-of-snapshots) for details.
3. **Processing change events:** Once connected to the source database, the {s_runner} processes the change events occurring in the database. The {s_runner} reads the database change logs, from which data changes are captured and transformed into manageable units and written out in near real time.
4. **Buffering the changes:** The changes captured from the source database are buffered within the {s_runner} before being written out to the destination. This buffering allows for efficient handling and processing of the changes before writing them to files. The files containing the changes are written when one of the following conditions is met:
* **Time threshold:** When the oldest change in a partition reaches a specific time threshold, the changes within that partition are written to a file. This ensures that changes are not held in the buffer for an extended period.
* **File size limit:** When the size of changes within a partition exceeds a specific limit, the changes are written to a file. This helps maintain manageable file sizes.
5. **Writing to the destination:** Once processed, the change batches are sent to the destination data warehouse or cloud storage.
* If required, you can make use of our [pre-built pipelines](/docs/streaming/sync-all-tables/) to load streamed data from cloud storage to a cloud data warehouse.
***
## Format of change records
Change records are batched into files for transfer to the destination. These files use the Avro format, which is optimized for ingestion into a cloud data warehouse. The following example shows the common structure of a change record within the Avro file. Variations may occur for different sources.
```json theme={null}
{
"before": null,
"after": {
"actor_id": "70ac0033-c25b-7687-5a86-6861c08cabdd",
"first_name": "john",
"last_name": "smith",
"last_update": 1635638400123456,
"version": 0
},
"metadata": {
"connector": "postgresql",
"db": "postgres_db",
"key": ["actor_id"],
"lsn": 37094192,
"name": "matillion",
"op": "r",
"schema": "public",
"table": "actor",
"ts_ms": 1635638400234,
"txId": 543,
"version": "1.7.1.Final"
}
}
```
The `op` field contains the type of the change for this record:
* **c:** Create
* **r:** Read (During snapshotting—read [Overview of snapshots](#overview-of-snapshots) for details.)
* **u:** Update
* **d:** Delete
The `before` and `after` fields contain the values in that record as they were before and after the change was applied, and as such the fields will differ by table. In cases where a record is created, the value for the `before` field will be empty (`null`); in cases where a record is deleted, the value for the `after` field will be empty (`null`).
***
## Schema drift
Schema Drift occurs when your data source changes its metadata. Fields, columns, and data types can be added, removed, or changed on the fly. If you don't account for schema drift, your data flow becomes vulnerable to changes in the upstream data source.
Streaming pipelines can adapt to these source schema changes and propagate them to the destination. These "self-healing" pipelines not only save time, they significantly reduce the number of job failures and delays due to schema drift. Users can ensure that data continues to flow, uninterrupted, from source to destination.
In a streaming pipeline, the {s_runner} loads data to your chosen destination cloud storage area, which is then transformed to accommodate schema changes. Changes are driven by data rather than by DDL, which means that any changes made to the schema of the source tables won't be reflected in the target until the data changes.
The streaming pipeline handles specific changes in accordance with the following principles:
* **Added tables:** You must create a new streaming pipeline to use a new source table; it's not automatically included in the existing pipeline.
* **Deleted tables:** If a table is deleted/dropped in your source, it's not dropped on the destination platform but will be retained for historical purposes. You can manually drop this table in the destination if needed.
* **Added columns:** The streaming pipeline will pick up any new columns added to selected tables if the new column contains data.
* **Deleted columns:** If a column is dropped from the source table, it will remain in your destination table and historical data will be retained up to the point of dropping. Values in this column after being dropped will be inserted as NULL.
* **Data type changes:** Data type changes will be accommodated, but if they aren't compatible changes for the destination cloud data platform (i.e. they are data types the destination does not support), this is handled in the following way:
* The column will be renamed as `_`, where `` has the format `_yyyymmddhhmmss`, and will be the same for all columns in the same table in the same streaming pipeline execution.
* The new column will be NULL up to the date of change, which needs to be considered for downstream dependencies such as views and reports.
***
## Create a Streaming pipeline
A Streaming pipeline is a set of source and target configuration details that enable your {s_runner} to monitor and consume changes from the source database, then stream these changes to the destination.
A Streaming pipeline links to a single source database. Multiple schemas within the same source database can be included in a single pipeline, but a new pipeline is required to link to a different database.
### Prerequisites
To run a Streaming pipeline, you need:
* A {s_runner}. {s_runner}s execute your Streaming pipelines and act as a bridge between {maia} and your data network while preserving your data sovereignty. Read [Create a {s_runner}](/docs/streaming/create-streaming-agent) to get started.
Each Streaming pipeline can connect to a single source database, and every Streaming pipeline must have its own {s_runner}. This means that for every database that you wish to connect to, you must create a corresponding {s_runner} and Streaming pipeline.
* A source database configured to support streaming. The required configuration for each source is described in the following documents:
* [Db2 for IBM i](/docs/streaming/db2-for-ibm-i-configure-database)
* [Microsoft SQL Server](/docs/streaming/microsoft-sql-server-configure-database)
* [MySQL](/docs/streaming/mysql-configure-database)
* [Oracle](/docs/streaming/oracle-configure-database)
* [PostgreSQL](/docs/streaming/postgresql-configure-database)
* An account with a destination service, either a cloud data warehouse or cloud storage. Currently supported destinations are:
* [Snowflake](/docs/streaming/snowflake-streaming-destination)
* [Amazon S3](/docs/streaming/amazon-s3-streaming-destination)
* [Azure Blob Storage](/docs/streaming/azure-blob-storage-streaming-destination)
* Access to a secrets manager service such as [AWS Secrets Manager](/docs/administration/aws-secrets-manager) or [Azure Key Vault](/docs/administration/azure-key-vault) for managing secrets. Your secret manager and {s_runner} must be hosted in the same cloud platform; you can't use an AWS {s_runner} with Azure Key Vault, for example.
* If you are using MySQL as a streaming source, you must [provide a MySQL driver](/docs/streaming/mysql-configure-agent/) for the {s_runner} to use.
### Get started
1. Log in to [{maia}](https://app.matillion.com/hub/).
2. In the left navigation, click .
3. Select your [project](/docs/guides/projects).
4. Click the **Streaming** tab. If you have previously created Streaming pipelines, they will be listed on this tab. Read [Manage Streaming pipelines](#manage-streaming-pipelines) for details of how you can interact with this list.
5. Click **Add Streaming pipeline** to create a new Streaming pipeline.
The rest of this section will explain how to set up your Streaming pipeline.
### Pipeline details
To start creating your Streaming pipeline, first complete these fields:
A unique, descriptive name for your Streaming pipeline.
A {s_runner} you have previously created as described in [{s_runner} installation](/docs/streaming/create-streaming-agent).
The drop-down will list all {s_runner}s which are currently valid to use, which means:
* The {s_runner} must have a status of **Running**.
* The {s_runner} must not already be assigned to another Streaming pipeline.
Your source database. Currently supported sources are:
* Db2 for IBM i
* Microsoft SQL Server
* MySQL
* Oracle
* Postgres
Your destination service. Currently supported destinations are:
* Snowflake
* Amazon S3
* Azure Blob Storage
### Destination connection
This section of the screen is only visible if your destination is **Snowflake**.
You need to configure a Snowflake connection as described in [Streaming to a Snowflake destination](/docs/streaming/snowflake-streaming-destination/#destination-connection).
### Destination configuration
Complete the properties in this section to configure the destination. The exact properties will depend on the destination you selected, so consult the appropriate documentation for details:
* [Streaming to a Snowflake destination](/docs/streaming/snowflake-streaming-destination/#destination-configuration)
* [Streaming to an Azure Blob Storage destination](/docs/streaming/azure-blob-storage-streaming-destination/#destination-configuration)
* [Streaming to an Amazon S3 destination](/docs/streaming/amazon-s3-streaming-destination/#destination-configuration)
### Source setup
Complete the properties in this section to configure the source. The exact properties will depend on the source you selected, so consult the appropriate documentation for details:
* [Db2 for IBM i](/docs/streaming/db2-for-ibm-i-streaming-source/#source-setup)
* [Microsoft SQL Server](/docs/streaming/microsoft-sql-server-streaming-source/#source-setup)
* [MySQL](/docs/streaming/mysql-streaming-source/#source-setup)
* [Oracle](/docs/streaming/oracle-streaming-source/#source-setup)
* [PostgreSQL](/docs/streaming/postgresql-streaming-source/#source-setup)
Click **Connect** to establish the connection to your source database.
### Pipeline configuration
In this section, choose which schemas and tables from the source will be included in your Streaming pipeline, and complete additional configuration properties.
Tables available in your source database will be displayed here. Choose the schemas and tables to include in the Streaming pipeline. The pipeline requires a minimum of one table.
Selecting more tables will affect performance and resource consumption, so consider carefully which tables you actually need, and select only those.
In the **Data preparation** section, select this checkbox to ensure that decimal data types are reflected as expected in Redshift. This checkbox is only available if you have selected Azure Blob Storage or Amazon S3 as your destination.
You only need to select this checkbox if you plan to load your data into Amazon Redshift. Selecting this checkbox overcomes a known Redshift limitation that affects decimal data types.
If using Snowflake as a destination, select the Streaming pipeline's replication type. This determines how the change data is replicated into Snowflake tables. Read [Replication types](/docs/streaming/snowflake-streaming-destination/#replication-types) to learn more.
If using Snowflake as a destination, choose the date, time, and timestamp processing strategy of your Streaming pipeline.
* **Snowflake Native Types (e.g. DATETIME):** This action will convert the source date/time value to an appropriate Snowflake type. If it's not possible to convert, the pipeline will output the value as a string. This is the default setting.
* **Integers from Epoch:** This action will load all date/time values as integers in Snowflake. You can use these integers to calculate the date and time by adding the value to the epoch value. Although this may be complicated, it has the benefit of maintaining a very accurate date/time value without any errors that may be caused by conversion in the pipeline.
Read [Dates and times strategy](/docs/streaming/snowflake-streaming-destination/#dates-and-times-strategy) to learn more.
Set up any additional parameters for your Streaming pipeline as key:value pairs. Refer to the documentation of your source connector to determine what parameters are available.
### Finish setting up
Click **Save pipeline** to finish creating your Streaming pipeline. You will be returned to the **Streaming** tab, where you'll see your new Streaming pipeline with basic metadata listed, including:
* The name of the pipeline.
* The status of the pipeline.
* The source database.
* The destination.
***
## Manage Streaming pipelines
Streaming pipelines are managed through the **Streaming** tab of your [project](/docs/guides/projects).
### View Streaming pipelines
To view the list of Streaming pipelines:
1. Log in to [{maia}](https://app.matillion.com/hub/).
2. In the left navigation, click .
3. Select your project.
4. Choose the **Streaming** tab.
From here, you can [create a new Streaming pipeline](#create-a-streaming-pipeline).
For each created pipeline, the following information is shown on this screen:
* **Name:** The name assigned to the pipeline.
* **Status:** The pipeline will have one of the following status codes:
* **Running:** The pipeline is active and streaming data.
* **Not Running:** The pipeline has been created but isn't currently streaming data, and may not be fully configured correctly. Check the pipeline configuration against the details given in [Create a Streaming pipeline](#create-a-streaming-pipeline) to ensure the configuration is correct.
* **Unknown:** The status of the pipeline can't be determined at this time. This may be because it's incorrectly set up, or because there is a problem communicating with the {s_runner}, or some other issue. Check the pipeline configuration against the details given in [Create a Streaming pipeline](#create-a-streaming-pipeline) to ensure the configuration is correct.
* **Source:** The pipeline's configured [source](#source-setup).
* **Destination:** The pipeline's configured [destination](#destination-configuration).
From this tab you can:
* Edit a pipeline. Click the three dots **...** next to the pipeline, and then click **Edit**.
* Start a pipeline. Click the three dots **...** next to the pipeline, and then click **Start**. The pipeline will begin streaming changes. This option is only available if the pipeline is currently in a **Not Running** state.
* Stop a pipeline. Click the three dots **...** next to the pipeline, and then click **Stop**. The pipeline will no longer stream changes. This option is only available if the pipeline is currently in a **Running** state.
* Delete a pipeline. Click the three dots **...** next to the pipeline, and then click **Delete**.
* View detailed information on the **Pipeline dashboard**. Click the name of a pipeline to see its dashboard.
### Pipeline dashboard
Click the name of any pipeline in the list of pipelines to see a dashboard showing more details about that pipeline. At the top is the pipeline name and current status, and below this is a **Pipeline information** panel, which shows the [source](#sources) and [destination](#destinations). Click **More details** to show full configuration details for the source and destination as well as information about the [{s_runner}](/docs/streaming/create-streaming-agent) running the pipeline.
Below the pipeline information are two tabs, **Overview** and **Snapshotting**.
From the dashboard you can perform the following actions:
* To [edit the pipeline configuration](#create-a-streaming-pipeline), click **Edit**.
* To stop a **Running** pipeline, click **Stop**
* To start a **Not Running** pipeline, click **Start**
* To return to the pipeline list, click **Streaming pipelines** in the top left.
#### Overview
With the **Overview** tab selected, you can see the following tabs.
* **Activity:** Shows a graph of the number of rows changed over a period of the last hour, day, seven days, or 30 days.
* **Tables selected:** Lists all tables selected for the pipeline.
* **Diagnostics:** Lists a set of pipeline metrics for debugging and support purposes. In case of an issue with your pipelines, [Matillion support](/docs/guides/getting-support) may ask you to copy this information and send it to us. To send diagnostics to Matillion support, click the refresh icon in the top left of the panel and then click **Copy all**, and paste the information into an email, or paste it into a file which can be attached to a support ticket.
Diagnostics are intended for Matillion support only, and it's not expected that you will use this information yourself to diagnose issues.
The **Pipeline events** panel displays a log of events generated by the running pipeline. Each event has an **Event type** and a **Timestamp**. `Pipeline Error` events can be expanded to show the error message or further information about the event. You can sort the list by ascending or descending **Timestamp**.
If **Email users on pipeline error** is toggled on, all project users will be emailed an alert when a pipeline produces a `Pipeline Error` event type (but not on other event types such as `Pipeline Started`).
#### Snapshotting
The **Snapshotting** tab displays details of snapshot requests currently queued. From here, you can monitor progress of the queue. Each snapshot request will be processed sequentially and removed from the queue on snapshot start. The pipeline must be running to show the snapshot queue.
To [make a new snapshot request](#configuring-a-snapshot), click **Request a snapshot**. New requests will be added to the queue.
The **Snapshot events** tab displays a log of events generated by running snapshots. Each event has an **Event type** and a **Timestamp**. Events can be expanded to show further information about the event. You can sort the list by ascending or descending **Timestamp**.
The **Metrics** tab provides a breakdown by table of snapshots performed since the pipeline started. If multiple snapshots have been performed on the same table, only the latest is shown.
***
## Overview of snapshots
Snapshotting the source database of a Streaming pipeline allows you to establish an up-to-date view of the database, giving you a baseline from which streaming changes begin.
A database snapshot captures a static view of the database at a certain point in time. Streaming can only capture database change operations that occur *after* the streaming pipeline is started, which means that no data existing in the source prior to the beginning of streaming will be copied to the target database. If you require the historical data to also be in the target, you would use snapshotting to synchronize the target to match the source at the point where streaming started.
The true value of a Streaming pipeline is realized by getting the pipeline into a streaming state as soon as possible. Large initial snapshots can delay the start of streaming by hours or even days, as streaming and snapshotting operations can't be performed in parallel. To avoid this undesirable situation, {maia} takes an approach that requires the pipeline to be configured and actively streaming *before* snapshotting begins. You can then control the timing of snapshotting to minimize streaming disruption.
To begin configuring your snapshots, read [Configuring and managing snapshots](#configuring-a-snapshot).
This feature requires that the [{s_runner}](/docs/streaming/create-streaming-agent) you are running is version **2.111.0** or later.
To determine what version your {s_runner} is, locate the {s_runner} in the **Runners** list and then click the three dots **...** → **Runner details**. The version is listed at the bottom of the list of {s_runner} parameters.
***
## Scheduling snapshots efficiently
When snapshotting a large number of tables, or a number of large tables, the snapshot can take several hours or even days. While a snapshot is running, streaming is paused for that pipeline. In some cases, the snapshot duration may last longer than the retention period of the source database logs, meaning the offset position may be lost and the pipeline becomes unable to re-enter a streaming state. Matillion's implementation of snapshotting avoids these potential problems by allowing you to break down a snapshot into a series of smaller requests, which can be interleaved with regular streaming.
Snapshot requests can be configured at any point after the pipeline has been started. The pipeline will continue to stream until a queued request is due, at which point it will pause streaming to allow the snapshot request to complete. Once all pending snapshot requests have been completed, the pipeline will then continue to stream until the next scheduled request.
The contents of a single snapshot request are completely configurable, and can consist of a single table, several tables, or selected parts of a larger table. If several tables are included in a single request, the request will be broken down into multiple single-table requests for processing purposes.
Advantages of this approach to streaming snapshots are:
* The snapshot has greater recoverability. If the pipeline is disrupted while a snapshot request is in progress, the snapshot process will resume from the beginning of that specific request, with no effect on requests already completed before the disruption.
* Because you configure the snapshots after the pipeline has started streaming, you can ensure that your streaming configuration is working as expected before proceeding with the snapshot.
* Breaking down large tables into smaller snapshot requests is useful to prevent log staleness, since streaming is restarted between each snapshot so it can catch up to the most recent change events.
* Breaking down large tables gives you flexibility when it comes to snapshotting only the data you require. For example, in a large table you may only need to snapshot data from after a specific cut-off date, and ignore the older data.
***
## Queueing and delaying snapshots
If you break a snapshot down into multiple requests, the requests will be queued and performed sequentially. When one snapshot completes, it will be removed from the queue and the next snapshot will begin.
You can configure a delay between the execution of different requests in the queue. The delay allows streaming to be restarted between each snapshot, to catch up to the most recent change events.
If no delay is configured, all queued snapshot requests will be executed consecutively, leaving no time for streaming to occur until all snapshots have been completed. This would increase the risk of log staleness and reduce recoverability, negating the benefit of the queuing approach.
If you don't set a delay between snapshots, there is a default delay of 60 seconds. This gives streaming a short window to catch up to the most recent change events, but may not be a long enough window and you may therefore wish to set a longer delay.
***
## Video example
Expand this box to watch our video about configuring a snapshot.
***
## Configuring a snapshot
A snapshot is a feature of Streaming pipelines that allows you to establish an up-to-date view of the source database, giving you a baseline from which to begin streaming changes.
Snapshots are configured separately for each Streaming pipeline. Before a snapshot can be added to a pipeline, the pipeline itself must be configured and in a **Streaming** state.
This section details the process of configuring and managing snapshots for your streaming pipelines. Before beginning, you should ensure you understand the concepts behind the feature, as explained in [Overview of snapshots](#overview-of-snapshots).
To configure a snapshot for a pipeline:
1. Log in to [{maia}](https://app.matillion.com/hub/).
2. In the left navigation, click .
3. Select your project.
4. Click the **Streaming** tab.
5. Select the pipeline you want to configure a snapshot for. This will open the [pipeline dashboard](#pipeline-dashboard). The dashboard page shows details of the pipeline configuration, as well as metrics on the progress of streaming and snapshotting.
If the pipeline is not in **Streaming** status, you may need to further configure the pipeline. Read [Manage Streaming pipelines](#manage-streaming-pipelines) for details.
6. On the pipeline dashboard, click the **Snapshotting** tab. This will show the [snapshot queue](#the-snapshot-queue), which initially will be empty.
7. Click **Request a snapshot**.
8. The **Select schemas** dialog shows all the tables that are part of the pipeline definition. Select the tables you want to snapshot. For each selected table, the dialog will display an SQL query which identifies what will be included in the snapshot. For example:
```
SELECT * FROM "my_schema"."my_table"
```
You can edit this query if you want to snapshot only part of the table. See [Snapshotting part of a table](#snapshotting-part-of-a-table) for details.
You can't snapshot a table that hasn't been included in the pipeline definition.
9. Enter a **Streaming catch up duration**. This should be the number of minutes you want to elapse between one queued snapshot request completing and the next one starting. This delay allows the pipeline to perform a certain amount of streaming between snapshot requests, to catch up to the most recent change events. Read [Queueing and delaying snapshots](#queueing-and-delaying-snapshots) for a discussion of how and why to use this feature.
10. Click **Snapshot *n* table(s)**.
The snapshot will begin executing immediately. If you selected more than one table to snapshot, one table snapshot will begin and the other tables will be added to the [snapshot queue](#the-snapshot-queue).
***
## Managing Snapshots
You manage a pipeline's snapshots from the [pipeline dashboard](#pipeline-dashboard). All snapshot status information is under the **Snapshotting** tab of the dashboard.
### The snapshot queue
Multiple snapshots can be configured for a single pipeline, and they will be queued and performed sequentially. When one snapshot completes, it will be removed from the queue and the next snapshot will begin.
If your snapshot request includes multiple tables, the request will automatically be broken down into single-table snapshot requests that are queued individually. This increases the resilience of the snapshot process, as a disruption (for example, due to network issues) can only ever result in a single table failing to snapshot and having to retry, with the remainder of the queued tables being unaffected.
You can configure a delay between the execution of different requests in the queue. This allows streaming to resume during the delay between snapshots, to catch up to the most recent change events.
To view the queue, click the **Snapshotting** tab on the pipeline dashboard. The queue is only visible when the pipeline is running.
By default, the queue is sorted into an arbitrary order.
### Snapshot events
When a snapshot request starts, completes, or fails, a **Snapshot event** is shown on the **Snapshotting** tab of the pipeline dashboard. The event description includes relevant details such as number of rows that were captured in a completed snapshot.
You can choose to receive fail event notifications via email. Select the option on the pipeline dashboard to enable email notifications.
### Repeating a snapshot
If you want to repeat a snapshot which has already completed, you need to configure a new snapshot with the same details, following the process given [above](#configuring-a-snapshot).
If you make multiple snapshot requests for the same data, this will result in duplicate rows in your target data, so be sure you really want this before repeating a snapshot. You must also be aware of this when breaking down a table into multiple requests for snapshotting, as a set of poorly written SQL queries could result in requests containing overlapping data, which again will result in duplicated rows in the target.
If you are using streaming simply for table synchronization, then repeating a snapshot has essentially no effect, as it will just overwrite the existing rows in the target.
### Recovering from a failed snapshot
There are three different scenarios in which snapshots can fail.
* A Streaming pipeline or {s_runner} encounters an irrecoverable error or is stopped while a snapshot is in progress.
* Upon restarting the pipeline, the disrupted snapshot will be restarted.
* Any remaining snapshots in the queue will execute in sequence after the completion of the restarted snapshot.
* The pipeline dashboard displays an [event](#snapshot-events) for the snapshot failure.
* A snapshot fails while the Streaming pipeline is still running. This can happen if the connection to the source database is temporarily interrupted, or if the SQL statement used to break down the snapshot of a large table is invalid.
* The failed snapshots will not automatically retry. You must manually recreate a failed snapshot in order for it to execute.
* The Streaming pipeline will continue to execute snapshots that remain in the snapshot queue.
* A persistent failure, such as the source database being unavailable, can cause multiple snapshots to fail, as each one in the queue is triggered in turn.
* The pipeline dashboard displays [events](#snapshot-events) for each snapshot failure.
* The table being snapshotted is removed from the pipeline configuration while the snapshot request is still in the queue.
* The snapshot will fail as soon as it attempts to start and will be removed from the queue.
* The following snapshot in the queue will be executed, in sequence.
* A fail [event](#snapshot-events) is displayed on the pipeline dashboard page with information highlighting that the snapshot was completed but no tables matching the requested table were identified in the pipeline.
* The snapshot will not be automatically retried.
For further information on why a snapshot failed, you can review the {s_runner} logs around the time of the snapshot failure event.
### Snapshotting part of a table
Snapshotting a large table can take time, which increases risk and affects recoverability. To overcome this, you can break down the snapshot of especially large tables into multiple discrete requests.
For example, if you have a source table with date column values ranging from 2022 to 2024, your first request could snapshot records for 2024, your second could snapshot 2023, and your final request could snapshot 2022.
Alternatively, you may only want to snapshot part of a given table, and exclude superfluous data. For example, you could create a single request to snapshot records dated 2024, and ignore 2023 and 2022. This gives you full control over which records you choose to snapshot, and improves snapshot efficiency and the usefulness of your target data.
You can break down a snapshot into as many or as few requests as you wish.
To snapshot just part of a table, you need to edit the SQL query displayed when you select the table while [configuring the snapshot](#configuring-a-snapshot).
For example, if your table has a numeric "year" column, and you only want the snapshot to include rows where the year is equal to 2024, you could write the following query:
```
SELECT * FROM "my_schema"."my_table" WHERE year = 2024
```
Errors in your query will cause the snapshot to fail, and will show the error in the event list on the dashboard.
This operation assumes a knowledge of basic SQL syntax, and writing incorrect queries will adversely affect your target data.
Use extra caution when writing these queries, and always test thoroughly before use, as even valid SQL could still have an unexpected result that causes your pipeline to fail.
### Adding more tables
At any point after a pipeline has started streaming you can add new source tables to the pipeline configuration, as described in the documentation for each streaming source.
Once the new table has been added to the pipeline configuration and the pipeline has been restarted, you can create a new snapshot for the table by following the process for creating a snapshot given [above](#configuring-a-snapshot).
### Re-baselining out-of-sync data
If a Streaming pipeline is stopped, either deliberately or through failure, for longer than the source database's change log retention period, there is a high probability that the source and target will become, and remain, out of sync. This means that when streaming is started again, changes may have been missed. In this case, a new baseline will need to be established to retain the synchronization between source and target.
To re-baseline data, configure a new snapshot of the source database.
This out-of-sync state may also be caused by stopping a pipeline and making a change to the destination configuration, such as changing the file prefix for a cloud storage destination. In this case, you will need to configure a new snapshot to re-baseline and re-load snapshotted data into the new storage destination.
***
## Source database maintenance
Source databases may undergo scheduled or ad hoc maintenance processes, including:
* Vacuuming
* Backups
* Log switching
* Log archiving
Make sure that tables and data are *not* locked or otherwise inaccessible when the initial snapshot phase of a pipeline is carried out. These processes can potentially disrupt streaming processes and give the impression that the pipeline is stalled. For example, if a {s_runner} log shows data was being processed but then shows no progress for a prolonged period, check with your source database administrator or admin that the data is accessible.
[PostgreSQL](/docs/streaming/postgresql-streaming-source) automated vacuuming can cause pipelines to stall. In these circumstances, terminate the vacuuming process to allow the streaming pipeline to continue.
***
## Deploy with Terraform
Use the [Matillion Streaming Terraform provider](https://registry.terraform.io/providers/matillion-public/matillion-streaming/latest) to create and manage {s_runner}s and pipelines.
The provider supports an end-to-end deployment workflow.
Use a single Terraform plan to manage the full lifecycle, from {s_runner} creation to pipeline setup to infrastructure provisioning.
### Deployment workflow
1. Create the {s_runner} resource. The provider exposes outputs for later steps.
2. Use the {s_runner} outputs to create the pipeline.
3. Use the {s_runner} outputs in your cloud configuration (AWS, Azure, or Google Cloud) to deploy the {s_runner}.
### Reusable configurations
Define reusable components, such as sources and targets. Reuse them across pipelines to reduce duplication and maintain consistency.
### Version control
Define {s_runner}s and pipelines as code. Store the configuration in a version control system.
This approach lets you:
* Track changes with a full audit trail.
* Review updates before applying them.
* Revert to a known good state.
 When you create a Streaming pipeline, the following happens:
1. **Connecting to the source database:** The {s_runner} establishes a connection with the source database, allowing it to capture data changes and track them in near real time.
2. **Snapshotting the source database:** An optional database snapshot captures a point-in-time view of your source database, to establish a current view of the data as a baseline from which to begin capturing changes to the data. Read [Overview of snapshotting](#overview-of-snapshots) for details.
3. **Processing change events:** Once connected to the source database, the {s_runner} processes the change events occurring in the database. The {s_runner} reads the database change logs, from which data changes are captured and transformed into manageable units and written out in near real time.
4. **Buffering the changes:** The changes captured from the source database are buffered within the {s_runner} before being written out to the destination. This buffering allows for efficient handling and processing of the changes before writing them to files. The files containing the changes are written when one of the following conditions is met:
* **Time threshold:** When the oldest change in a partition reaches a specific time threshold, the changes within that partition are written to a file. This ensures that changes are not held in the buffer for an extended period.
* **File size limit:** When the size of changes within a partition exceeds a specific limit, the changes are written to a file. This helps maintain manageable file sizes.
5. **Writing to the destination:** Once processed, the change batches are sent to the destination data warehouse or cloud storage.
* If required, you can make use of our [pre-built pipelines](/docs/streaming/sync-all-tables/) to load streamed data from cloud storage to a cloud data warehouse.
***
## Format of change records
Change records are batched into files for transfer to the destination. These files use the Avro format, which is optimized for ingestion into a cloud data warehouse. The following example shows the common structure of a change record within the Avro file. Variations may occur for different sources.
```json theme={null}
{
"before": null,
"after": {
"actor_id": "70ac0033-c25b-7687-5a86-6861c08cabdd",
"first_name": "john",
"last_name": "smith",
"last_update": 1635638400123456,
"version": 0
},
"metadata": {
"connector": "postgresql",
"db": "postgres_db",
"key": ["actor_id"],
"lsn": 37094192,
"name": "matillion",
"op": "r",
"schema": "public",
"table": "actor",
"ts_ms": 1635638400234,
"txId": 543,
"version": "1.7.1.Final"
}
}
```
The `op` field contains the type of the change for this record:
* **c:** Create
* **r:** Read (During snapshotting—read [Overview of snapshots](#overview-of-snapshots) for details.)
* **u:** Update
* **d:** Delete
The `before` and `after` fields contain the values in that record as they were before and after the change was applied, and as such the fields will differ by table. In cases where a record is created, the value for the `before` field will be empty (`null`); in cases where a record is deleted, the value for the `after` field will be empty (`null`).
***
## Schema drift
Schema Drift occurs when your data source changes its metadata. Fields, columns, and data types can be added, removed, or changed on the fly. If you don't account for schema drift, your data flow becomes vulnerable to changes in the upstream data source.
Streaming pipelines can adapt to these source schema changes and propagate them to the destination. These "self-healing" pipelines not only save time, they significantly reduce the number of job failures and delays due to schema drift. Users can ensure that data continues to flow, uninterrupted, from source to destination.
In a streaming pipeline, the {s_runner} loads data to your chosen destination cloud storage area, which is then transformed to accommodate schema changes. Changes are driven by data rather than by DDL, which means that any changes made to the schema of the source tables won't be reflected in the target until the data changes.
The streaming pipeline handles specific changes in accordance with the following principles:
* **Added tables:** You must create a new streaming pipeline to use a new source table; it's not automatically included in the existing pipeline.
* **Deleted tables:** If a table is deleted/dropped in your source, it's not dropped on the destination platform but will be retained for historical purposes. You can manually drop this table in the destination if needed.
* **Added columns:** The streaming pipeline will pick up any new columns added to selected tables if the new column contains data.
* **Deleted columns:** If a column is dropped from the source table, it will remain in your destination table and historical data will be retained up to the point of dropping. Values in this column after being dropped will be inserted as NULL.
* **Data type changes:** Data type changes will be accommodated, but if they aren't compatible changes for the destination cloud data platform (i.e. they are data types the destination does not support), this is handled in the following way:
* The column will be renamed as `
When you create a Streaming pipeline, the following happens:
1. **Connecting to the source database:** The {s_runner} establishes a connection with the source database, allowing it to capture data changes and track them in near real time.
2. **Snapshotting the source database:** An optional database snapshot captures a point-in-time view of your source database, to establish a current view of the data as a baseline from which to begin capturing changes to the data. Read [Overview of snapshotting](#overview-of-snapshots) for details.
3. **Processing change events:** Once connected to the source database, the {s_runner} processes the change events occurring in the database. The {s_runner} reads the database change logs, from which data changes are captured and transformed into manageable units and written out in near real time.
4. **Buffering the changes:** The changes captured from the source database are buffered within the {s_runner} before being written out to the destination. This buffering allows for efficient handling and processing of the changes before writing them to files. The files containing the changes are written when one of the following conditions is met:
* **Time threshold:** When the oldest change in a partition reaches a specific time threshold, the changes within that partition are written to a file. This ensures that changes are not held in the buffer for an extended period.
* **File size limit:** When the size of changes within a partition exceeds a specific limit, the changes are written to a file. This helps maintain manageable file sizes.
5. **Writing to the destination:** Once processed, the change batches are sent to the destination data warehouse or cloud storage.
* If required, you can make use of our [pre-built pipelines](/docs/streaming/sync-all-tables/) to load streamed data from cloud storage to a cloud data warehouse.
***
## Format of change records
Change records are batched into files for transfer to the destination. These files use the Avro format, which is optimized for ingestion into a cloud data warehouse. The following example shows the common structure of a change record within the Avro file. Variations may occur for different sources.
```json theme={null}
{
"before": null,
"after": {
"actor_id": "70ac0033-c25b-7687-5a86-6861c08cabdd",
"first_name": "john",
"last_name": "smith",
"last_update": 1635638400123456,
"version": 0
},
"metadata": {
"connector": "postgresql",
"db": "postgres_db",
"key": ["actor_id"],
"lsn": 37094192,
"name": "matillion",
"op": "r",
"schema": "public",
"table": "actor",
"ts_ms": 1635638400234,
"txId": 543,
"version": "1.7.1.Final"
}
}
```
The `op` field contains the type of the change for this record:
* **c:** Create
* **r:** Read (During snapshotting—read [Overview of snapshots](#overview-of-snapshots) for details.)
* **u:** Update
* **d:** Delete
The `before` and `after` fields contain the values in that record as they were before and after the change was applied, and as such the fields will differ by table. In cases where a record is created, the value for the `before` field will be empty (`null`); in cases where a record is deleted, the value for the `after` field will be empty (`null`).
***
## Schema drift
Schema Drift occurs when your data source changes its metadata. Fields, columns, and data types can be added, removed, or changed on the fly. If you don't account for schema drift, your data flow becomes vulnerable to changes in the upstream data source.
Streaming pipelines can adapt to these source schema changes and propagate them to the destination. These "self-healing" pipelines not only save time, they significantly reduce the number of job failures and delays due to schema drift. Users can ensure that data continues to flow, uninterrupted, from source to destination.
In a streaming pipeline, the {s_runner} loads data to your chosen destination cloud storage area, which is then transformed to accommodate schema changes. Changes are driven by data rather than by DDL, which means that any changes made to the schema of the source tables won't be reflected in the target until the data changes.
The streaming pipeline handles specific changes in accordance with the following principles:
* **Added tables:** You must create a new streaming pipeline to use a new source table; it's not automatically included in the existing pipeline.
* **Deleted tables:** If a table is deleted/dropped in your source, it's not dropped on the destination platform but will be retained for historical purposes. You can manually drop this table in the destination if needed.
* **Added columns:** The streaming pipeline will pick up any new columns added to selected tables if the new column contains data.
* **Deleted columns:** If a column is dropped from the source table, it will remain in your destination table and historical data will be retained up to the point of dropping. Values in this column after being dropped will be inserted as NULL.
* **Data type changes:** Data type changes will be accommodated, but if they aren't compatible changes for the destination cloud data platform (i.e. they are data types the destination does not support), this is handled in the following way:
* The column will be renamed as `